
This page may contain affiliate links. As an Amazon Associate I earn from qualifying purchases.
Complete Guide to 3D Printing Cosplay Costumes and Props
Updated: April 2022
Introduction
Cosplayers are renowned for their skill and creativity in bringing characters to life. They use their exceptional craftsmanship to create incredible costumes and props.
And while traditional techniques such as sewing and sculpting are still the go-to methods, 3D printing is increasingly being used for many aspects of cosplay costume creation.
3D printing has many advantages over traditional methods that can take your Cosplay costumes to the next level.
How to Use 3D Printing for Cosplay
3D Printing can be used in many aspects of your costume creation. From making props and accessories to go with your existing cosplay, to creating complete costumes including helmets and amour.
There are thousands of cosplayers across the globe using 3D printers, and not only that, many of them design their own models and share them online so you can make them on your own 3-D printer just by downloading them and pressing print!
But, of course, the heart of Cosplay is creativity, and that’s why the most popular way of using 3D printing is to use it to make costumes and props that would otherwise be impossible without a movie studio budget.
Is 3D Printing Cosplay Cheating?!
In a word, no! I think in general people’s opinion of 3D printing in Cosplay is changing as they begin to understand the work that goes into creating a functional 3D printed model.
New technology in any arena always creates these sorts of arguments, and it’s understandable for someone who’s spent so many hundreds of hours honing a skill to feel cheated by a machine that can do it quicker and easier.
However, 3D printers don’t magically create cosplay armor at the touch of a button. There is instead a whole new set of skills required in both software, hardware, and good old-fashioned model-making to make those prints even equal in quality to their handmade equivalent.
Not only that, 3D printing is allowing a whole new group of people with their own skill set to get into Cosplay and take it in an exciting new direction that integrates new technology more than ever.
As this video by Lightning Cosplay shows, there’s a great deal of skill and manual labor required to turn 3D prints into Cosplay to be proud of.
Where Do I Get Cosplay CAD Models From?
The first decision you need to make when you start 3D printing cosplay is where you will get your 3D model from?
The 3D model is purely a visual representation of the code that will tell your 3D printer what to create.
There are several options here, from creating something entirely from scratch (hard) to using someone else’s model (easy!)
Create Your Own
If you already have the skills, then the best and most creative way is to design your own model. There are many pieces of free CAD software available that are very capable and quick for you to learn. Blender, 3DS Max, and Maya are good examples. You can import existing models into your CAD software, use a 3D scanner to scan real objects and turn them into 3D CAD data or create your own models from scratch.
Download Free Models
If you’re not a fan of creating your own Cosplay models, then you can download thousands of ready-made models from online repositories like Thingiverse and MyMiniFactory.
Pay a Designer
Finally, if you want to bring the character of your dreams to life without learning how to use CAD, you can hire a 3D designer from Shapeways or MakeXYZ. Both of these companies are known for their expertise in this field. Maybe you’re not ready yet to dump a whole lot of time into creating models in which case you can just get your feet wet with the freely available models in many of these sites.
Choosing the Best 3D Printer for Cosplay
The two main aspects of cosplay that set it apart from most other 3D printer applications are that the parts you’ll want to print need to be large and durable enough to be worn and used. This makes the decision process a bit easier for Cosplayers as you should generally be looking for the largest 3D printer that can print ABS. But let’s break those specs down into more detail so you can be sure you’re buying the best printer for your purposes.
Printer type
The world of consumer 3D printing can be broadly divided into 2 classes; Fused Filament Fabrication (FFF) where the filament is melted and extruded from the hot end to print the object, and Stereolithography (SLA) where a high-powered laser is focused on a photosensitive resin-based material.
Both types have their advantages and disadvantages. The main difference is that SLA is more accurate and can create more detailed parts. However SLA printers are small and so are not well suited to producing large prints that Cosplayers need, and the material costs are prohibitive for large parts too.
Materials
If you plan to make costumes to be worn, then one of the most essential features to look for is a 3D printer that can print in ABS material.
The durability of your prints comes down to the material they are made from. The most popular 3D printing material is plastic called PLA. For most uses PLA is perfect, however, for cosplay, it does have some properties that may cause a problem. Firstly, PLA deforms when it gets hot. Most of the time this isn’t a problem, but if you were to say leave your PLA costume in a hot car, it could distort and become spoiled.
Secondly, PLA is a little on the brittle side. This means if you drop it, or are a bit too vigorous when jumping around in your costume, it could crack.
Both of these problems found with PLA can be easily solved by swapping to an alternative plastic called ABS.
ABS is tough and durable, and can easily withstand hot temperatures. Of course, there’s a reason ABS isn’t the most popular 3D printer material, and that is because it is harder to print.
This is because when it cools after being printed, it warps. So you must ensure your whole print is kept at a moderate temperature as it is being printed.
This means you need a printer that is enclosed to keep the warm air in and any cold draughts out.
Print Volume
One of the first things that you need to look at is the build volume of the printer.
Every printer has a limit on how big a model it can produce and that is dictated mostly by the build volume.
The volume is defined by the size of the print bed and the maximum height of movement that the printhead can make, and is usually measured in cubic inches. While smaller hobby printers generally have a print volume of 200-300 cubic inches (6-7 inches in each of the axes), you should be aiming at a printer with as large a print volume as you can afford.
Many home 3D printers are mini 3d printers with a small build volume, these aren’t generally large enough for printing cosplay items.
In most cases, even with the largest 3D printer, you’ll still need to print your costume in sections and then glue them together later. The smaller your 3D printer is, the more parts you’ll need to split your costume into and then the more work you’ll have to bond them back together. Bonded joints like this can look untidy, create a weak point, and it’s more work for you.
Other Materials
Other than the two most popular choices of ABS and PLA, you might also want to consider materials like TPE or HDPE which can give you very different material properties like flexibility.
In most cases, you will require to print in different colors and materials to achieve as many characteristics of your cosplay as possible. If you want to print durable and realistic costumes, you will need different kinds of printing materials and a variety of post-print processes.
Cosplay costumes and props in Sci-Fi genre may require a wide range of materials such as ceramics, metal, and wood. For instance, props such as shields and swords may require exotic materials such as PCT and PCL. You may also want to use metallic filaments to create metallic finishes.
Print speed
No matter how you look at it, 3D printing is a rather slow process. I don’t want to rain on your parade, but there’s no way to print your cosplay costume instantly! It takes a good few hours to print even the smallest of the objects. It should take you anywhere from 6 hours to half a day to produce a 6″ prop.
Fortunately, there are ways to make your 3D printer work as quickly as possible, and there are things to looks out for when choosing a 3D printer to make sure you get one that can print as quickly as possible.
3D printers that are well-designed and solidly built with high-quality components are much more able to cope with higher printing speeds without reducing quality whereas printers that are flimsy or poorly designed will tend to lose accuracy at anything other than slow speeds.
The easiest way to speed up the printing process is to compromise on quality. For the most detailed prints, you would set your layer thickness to be 0.1mm but for large cosplay parts, this level of accuracy may not be required and increasing it to 0.2 or 0.4mm could easily halve the printing time.
Ease of use
3D printing can seem like a daunting task at first. If you don’t have the knowledge or prior experience of using one, you’re bound to get bewildered with all the options and parameters.
Do you set the hot end temperature to high or low? Is the speed right or does it need to be printed slower? And, believe me, that’s part of the learning process.
There are 3D printers available that automate much of the process, and in many ways, they guarantee success without much input from yourself other than pressing start.
However, these printers tend to have a limit to the functionality that you will soon reach and then feel frustrated at being held back from improving.
As with most things in life, you will get the most out of 3D printing by learning by your mistakes, and if you choose a 3D printer that doesn’t allow you to make mistakes you won’t learn very much!
So, choosing a printer that keeps the right balance between simplicity and functionality is very important.
Kit or Assembled
If you don’t have much mechanical or DIY experience, you may want to consider a printer that is shipped mostly assembled. The assembly and set up of a DIY kit 3D printer is generally not too complicated but can be a bit daunting.
Many 3D printers available now come as ‘semi-assembled.’ This usually means they arrive in two parts which you then have to bolt together with around four or eight screws and a hex key. Most people are more than capable of assembling this type of printer. If you have any experience of using Lego Technic or building your own PCs, then you’ll be more than capable of handling one of these.
If you choose an already assembled printer, you will only need to load the filament, maybe set the calibration, and then start printing within minutes.
Resolution
The resolution of 3D printers is often talked about when 3D printers are compared, but just how important is it?
Making a Decision
When you first start thinking about buying a 3D printer for making Cosplay items you might have a Cosplay prop or costume in mind that you really want to 3D print and then base your purchasing decision on this one application. For example, a particularly detailed prop that would just take too much of your time to sculpt.
However, it’s essential to realize that the more you use your 3D printer, the more uses you’ll find for it so you definitely shouldn’t limit yourself by buying a 3D printer that will only be good for one aspect of your cosplay.
Best 3D Printers for Cosplay
Here are my hand-picked 3D printers that are the best choices for 3D printing cosplay costumes, props, and accessories. All these 3D printers meet the criteria I’ve spoken about above and I’ve chosen models that fit a wide range of budgets so you don’t have to feel like you’re breaking the bank to take your Cosplay to the next level.
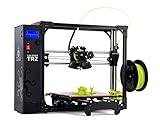
Creality CR-10S

Creality turned home 3D printing on its head when they released the CR-10 in 2017. That first model became wildly popular due to its vast build volume (three times that of most competitors) and low price point.
The CR-10S is an upgraded version that adds an additional z-axis motor and a few other improvements and tweaks that make it more accurate and reliable.
Features
- The most notable feature of the CR 10S is the enormous build volume of 11.8 x 11.8 x 15.8 inches (300 x 300 x 400mm). This is larger than some of the really high-end printers like the LulzBot Taz 6 and Zortax M300 and more than enough for most of your cosplay props
- Supports PLA and most exotic filament blends. ABS can be printed if you supply your own enclosure and it fully supports third-party filaments
- TPU can be printed but will be tricky due to Bowden extruder, plenty of people find success by avoiding the softer options
- Power loss recovery system and filament sensor are a lifesaver in many situations
- When the filament and control box is stacked on the print bed, the footprint is relatively small at 21.2 x 25.2 x 12.2 inches, and it only weighs 10.5 kg so it can be moved or stored away easily
- It comes semi-assembled. The remaining assembly can be done in 30 minutes making it perfect for all skill levels
- Removable glass heated bed
- Intuitive but basic user interface
- The manufacturer claims that the printer can happily withstand up to 200 hours of continuous operation. This is backed up by many owners who use the CR-10s print volume to its max for very large prints. This is a very convenient feature for cosplayers printing large costume parts and props.
Specs
- Build volume: 300 x 300 x 400mm
- Layer resolution: 0.1-0.4mm
- Nozzle: 0.44mm
- Print speed: 80-200m/s
Pros
- First things first; it’s much cheaper than nearly all 3D printers with the same build volume
- The print quality is on par with 3D printers that cost twice as much
- Other than some minor issues due to inconstant quality control, the CR-10 family of printers is considered very reliable and robust
- There is a large community of owners that are more than willing to welcome you and help in any way they can
Cons
- The open frame design makes heat management a headache. As a result, materials needing higher and consistent temperatures (such as ABS) are best avoided unless you’re willing to buy or make an enclosure
- Some variability in quality control means some printers require more tweaking than others to work their best
- The print bed glass sheet is often not completely flat. A very popular mod is to replace it with a mirror tile from IKEA which is guaranteed perfectly flat. I was able to fix mine by adding aluminum foil shims under the lowest area
- The power supply, motherboard, and controls are housed in a separate box that takes up additional workspace
Verdict
For the size of its print volume compared to its price the CR-10S outperforms most of its competitors. In short, it’s a no-nonsense 3D printer that knows how to get the job done. So, if you’re looking for something that is both cheap and effective, the Creality CR-10S should be your go-to printer.
It is difficult to find a 3D printer with such a large print volume in this price range. Compared to most of its peers, the CR-10S is exceptionally functional and capable of producing large prints.
In terms of appearance, the CR-10S has an appealing figure that makes it recognizable even from afar. It features a minimalistic design with back-coated aluminum rails, a glass heated bed, and a detached control box on the side. This printer has a slender frame with orange inlaid stripes.
One of the significant issues with this printer is the large footprint. The filament holder is attached in a way that there must be space between the control box and the frame for the filament to feed into the extruder unhindered. On the other hand, the frame itself is minimal compared to the print volume. It’s worth checking out the new updated CR-10 V2.
LulzBot TAZ 6
When choosing a 3D printer to make cosplay items, some of the most important factors to consider will be reliability and ease of use. The LulzBot TAZ 6 provides all these in spades, as well as the essential large print volume, making it one of the best printers for 3D printing cosplay.
It is manufactured by a Colorado-based 3D company known as Aleph Objects. It’s priced at the higher end of the market; however, the high price is compensated with generous build volume, faultless reliability and more.
Despite the funny name, LulzBot has gained a considerable reputation for their dependable machines that are known as workhorses in the 3D printing community.
Features
- It’s compatible with a wide array of different materials – PLA, ABS, TPU, PETG, HIPS and the exotics to name a few. It supports third-party materials.
- It comes with a build volume (11.02 in x 11.02 in x 9.80 in) which is pretty good for printing cosplay props.
- It offers features like auto bed leveling, a heated PEI bed surface, and upgradable modular tool head.
- This printer maintains the same industrial design as its predecessors as well as an open framework made from extruded aluminum. Actually, some parts of the printer are 3D printed.
- The Taz 6 provides a lot of improvements and new features not included in its predecessor the Taz 5. For instance, there is an automatic print leveling system with metal discs at the corners of the print bed for easier leveling. The automated print bed leveling makes it much easier to set up and calibrate the printer. Also, the printer features an extruder that automatically cleans itself, removing filament that may have stuck in the printhead, this helps to improve reliability and print quality.
- The enormous print platform features a plastic material known as polyetherimide (PEI) which helps to improve adhesion. The heated bed can achieve a maximum temperature of 248 degrees Fahrenheit. Due to the
- The all-metal hot end can reach very high temperatures so it can handle a wide range of print materials.
Specs
- Footprint measures 32.3 x 25.8 x 20.5 inches
- Weighs nearly 14.9 kg
- Print Surface: PEI
- Build volume: 11.02 in x 11.02 in x 9.80 in (280 x 280 x 250mm)
- Max print speed: 200mm/s
- Filament: 3.00 mm
- Nozzle: 0.4 mm
- Connectivity: USB
Pros
- The extra-spacious build volume gives you the freedom to print bigger models or props.
- The print quality of LulzBot TAZ 6 is simply outstanding enabling you to print models with considerable details.
- Self-cleaning nozzle and auto leveling print bed are two of the handiest features to get hold of.
- Reliable and consistent performance
- Solid and sturdy design
Cons
- The price is slightly on the higher side for an intermediate grade printer.
- The absence of Wi-Fi and SD-Card connectivity is going to be a deal breaker for some.
- No controls on the printer, everything is done via your PC or Mac connected via USB.
- The noise level could be an issue due to its open-frame design.
Verdict
The LulzBot TAZ 6 is more expensive than the CR-10S, but its US standard quality control means you’ll be in no doubt that it will perform straight out of the box. This printer is known throughout the 3D printing world for its well-built design and quality printing.
One of the most critical issues with this printer is a lack of controls for standalone printing. For example, there is no option to feed the printing material on the LCD screen which makes switching materials difficult especially for first-time users.
Also, the printer takes longer to heat the print bed and calibrate than some of its competitors.
Nevertheless, the TAZ6 offers such consistent and high-quality prints that you’d be well recommended to get used to working slightly differently, embrace its quirks, and benefit from its superior performance.
Ultimaker 3 Extended

The Ultimaker 3+ is one of the most high-end production 3D printers that I recommend for cosplayers. It features two extruders, supreme accuracy due to its high-quality construction, and a host of connectivity options.
Ultimaker set a very high standard with their range of printers, and are regarded as the go-to brand if money is no object. Their performance and reliability can only really be bettered by commercial-grade 3D printers that cost many multiples more.
To print ABS successfully, you will also need to buy the Ultimaker ‘Advanced 3D Printing Kit’ which contains amongst other things, a front enclosure add-on. This seals up the only opening on the Ultimaker 3+ to provide the consistent temperature environment ABS needs to avoid shrinkage.
Features
- The UM3+ supports an array of different materials including PLA, ABS, Nylon, CPE, TPU 95A and PVA.
- It fully supports third-party materials although Ultimaker branded filament features an NFC chip which automatically applies optimum settings.
- The build volume is generous at 8.5 x 8.5 x 11.8 inches (197 x 215 x 300mm), this reduces slightly when dual extrusion is used to 7.8 x 8.5 x 11.8 inches.
- It comes with many useful features such as a dual extrusion print head, auto leveling print bed, and live camera.
- Plenty of connectivity options like Wi-Fi, USB, and LAN.
- The footprint is 13.5 x 19.9 x 27.1 inches (including the spool holder and the Bowden tube). It’s pretty lightweight at merely 11.3 kg (think about Raise3D Pro2 Plus which weighs more than 50 kg!)
Specs
- Filament: 2.85mm (Nylon, PLA, ABS, CPE, PVA, PC, TPU 95A and more)
- Nozzle: 0.25-0.8mm
- Maximum bed temperature: 100˚C
- Maximum hot end temperature: 280˚C
- Print Bed: Borosilicate glass
Pros
- The print quality of this machine is hands down one of the best among its competitors.
- The dual extruder system makes it possible to print objects that are seemingly impossible for a single intrusion printer (such as a breakaway or soluble supports).
- Dual extrusion doesn’t reduce print quality as it does on some printers.
- It’s a real workhorse printer that is unlikely to let you down in terms of reliability.
- Connectivity options are plentiful – Wi-Fi, USB, and Ethernet enable you to print in any situation.
- The easy to use design of Ultimaker 3 Extended makes it an excellent choice even for newbies.
Cons
- It’s in the highest price bracket
- Print speed can be slower than other machines for comparable quality especially when using dual extrusion.
- Filament spools are awkward to access at the rear of the printer
Verdict
To put it bluntly; if you’ve got the moolah get the Ultimaker!
The Ultimaker 3 Extended is one of the most popular choices amongst long term enthusiasts and professionals. If you’ve been 3D printing for a while then, an Ultimaker printer will be on your wish list.
It’s robust, reliable and accurate – all that you might expect from a great printer. The price, however, is the only factor that could deter you from buying it.
The Ultimaker 3 3D printer is one of the best printers for cosplay items due to its dual extrusion capabilities, its ability to successfully print ABS, TPU, and dissolvable supports and its impressive reliability record.
Raise3D Pro2 Plus

The Pro 2 Plus features an enormous build volume of 12 × 12 × 23.8 inches (305 x 305 x 605mm) making it the biggest printer in this article. This large volume makes it ideal for 3D printing large cosplay costumes, significantly reducing the amount of splitting up of parts you need to do.
Like the Ultimaker 3+, this 3D printer is not meant to be tinkered with but to deliver results out of the box without the need for any upgrades.
Specs
- Supports a lot of different types of materials including PLA, ABS, TPE, Nylon, PVA, and all the exotics (such as Carbon Fiber and Wood filled).
- The build volume is gigantic at 12 × 12 × 23.8 inches.
- Features like dual-head printing system, auto-bed leveling, live camera, and HEPA filter comes handy in many situations.
- Second generation power resume is a lifesaver for large prints!
- Connectivity options include Wi-Fi, USB, and Ethernet.
- The footprint is large with dimensions 24.4 × 23.2 × 43.5 inches and weighing 52 kg
- Maximum bed temperature: 110˚C
- Nozzle size: 0.2 – 0.8mm
- Filament: 1.75mm
Pros
- The print quality is, first and foremost, excellent.
- It consistently gives excellent results no matter if it’s your first print or the 50th.
- The total acrylic enclosed body makes for better heat management for successfully printing ABS.
- Features like dual extrusion printhead, power loss resuming system and HEPA filter are worth having.
- The bundled Ideamaker software is indeed a powerhouse.
- Impressive build quality
Cons
- No print finish notification is available, quite a bummer for large prints!
- Calibration can prove to be a bit tricky for the newcomers.
- Does not feature filament run-out sensor
- Cannot fit filament spools larger than 1kg in the built-in holders. Large spools need to be held outside of the machine on your own holder.
Features
The Raise3D Pro Plus is so vast that it will be delivered to you on a pallet! So, you will need to free up plenty of space on your workspace to accommodate it! Also, at 52kgs you may need some assistance to get it set up, but that just sounds like an excellent excuse to invite someone around to show off your new toy!
Underneath there are some nifty built-in casters that allow you to wheel it around quickly and then lock them once it is in position.
It is fully enclosed with a transparent acrylic casing. This is not only a safety feature but also ensures you can print temperature sensitive materials like ABS and HIPS.
The printer features a cooling fan and HEPA filter which Raise3D claims will trap ninety percent of contaminants from the exhaust air, this is very important when printing ABS which is toxic.
The printer is capable of handling a wide range of materials including PLA, HIPS, ABS, PLA derivates, Nylon, ASA, etc. You can also use flexible and abrasive materials such as glass fiber enforced, carbon fiber reinforced and metal. The maximum temperature on the nozzle is an impressive 300C.
Another prominent feature of the Pro 2 Plus is the improved build plate system. It is an aerospace-grade aluminum print bed which is removable and features a lock system that prevents slippage. Under the plate, there is a silicon heated pad that helps to improve the distribution of heat.
Verdict
Truth be told, the Pro2 Plus is not for everybody. This is a costly 3D printer and other than the vast print volume, and high quality feel to the construction there isn’t much more this 3D printer offers to Cosplayers that the Ultimaker and Dremel don’t.
The Pro2 Plus is aimed at a small business or hardcore printing geeks, and if you really know your business, and can justify the price, then there are few alternatives without jumping up to the commercial grade level with an associated price jump.
Overall, the Raise3D Pro2 Plus produces excellent print quality making it ideal for cosplay item printing. As mentioned earlier, this printer does not require any tinkering to produce quality prints.
Creality Ender 3 Pro

If your budget is at the lowest end of the spectrum or you just want to dip your toes in the water of 3D printing Cosplay, then few 3D printers can match the Creality Ender 3 Pro in terms of quality, reliability, ease of use. Combine this with an enthusiastic group of owners that will help you fix any problems, and it becomes hard to argue against getting an Ender 3!
In fact, the Ender 3 Pro is considered to be the best affordable 3D printer on the market (not just by me!). It is shipped semi-assembled which means you need to bolt a few things together and plug in some cables. There’s really nothing too taxing about the assembly and there a lot of videos and guides online that can help you if the enclosed print outs aren’t clear.
As for its suitability at printing Cosplay props, the Ender 3 is definitely a compromise in the name of saving money. However, this doesn’t mean you can’t make it work and have fun trying. For its price, the print volume is pretty good at 220 x 220 x 250mm. It will print ABS, but only if you construct your own enclosure, and it can print flexibles and exotic filaments with a little trial and error and maybe a nozzle upgrade to prevent abrasive wear.
Specs
- Print volume: 220 x 220 x 250mm
- Nozzle: 0.4mm
- Filament: 1.75mm
- Max print speed: 200mm/s
- Min layer resolution: 0.1mm
- Connectivity: USB, MicroSD
Pros
- Affordable
- Quality Prints
- Easy to assemble and set up
- Impressive build volume
- Sturdy frame
Cons
- Poor assembly guide
- The magnetic print bed can be fiddly to fit straight
Features
While I wouldn’t normally consider pricing a feature, the low price to performance ratio of the Creality Ender 3 has to be its most significant selling point.
It features a generous heated print bed that measures 220 x 220 x 250mm. The print platform features a BuildTak-like sticker to improve adhesion and easier removal of prints, and on the Pro model, it is attached magnetically, so it can easily be removed to aid print removal.
Another impressive feature of this printer is the ability to recover from a power outage and resume printing. This is a feature that is often only featured in high-end 3D printers. It’s another feature that separates the Ender 3 from its budget competitors.
Verdict
After spending some time with the Ender 3, it’s hard not to grow fond of it. Even though you might experience some few hitches here and there, you are unlikely to encounter a problem that can’t be fixed with a little tinkering. If you take the low price point into consideration, this is a very impressive 3D printer.
The Ender 3 is equipped with incredible features that set it apart from its competitors. For instance, build volume is not that impressive, but won’t hinder you massively at 220 x 220 x 250mm. Also, the heated build plate employs a technology known as BuildTak.
There is also a power recovery mode and a constricted filament pathway that makes it easier to print flexible materials. Some of these features are hard to find even in high-end products.
At this price range, there are naturally some compromises to be made. Like many 3D printers from China, quality control can be a bit variable. Although the Ender 3 has a pretty good reputation on this front, you may encounter some issues like the frame being slightly warped or the print bed not being flat.
Nevertheless, the Ender 3 is an excellent choice for beginners in spite of its flaws, the low price point makes it deserve the plaudits that have rained down on it.
Dremel DigiLab 3D45
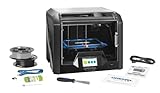
I’ve owned and used a Dremel 3D45 for a while now, and I feel compelled to include it on this list for the simple reason that it’s probably the most reliable, and easy to use 3D printer for its price. It’s also designed to be used in schools, so it has several safety features that make it very suitable as a family 3D printer.
Ultimately it sits somewhere between the CR-10S and the TAZ6 in price and ability, and it has an added bonus of being a completely enclosed design. Unfortunately, that enclosure doesn’t mean it can print ABS because although Dremel does technically allow you to print using any third part filament, doing so will invalidate your warranty!
There is a workaround of sorts which is the ‘ECO-ABS’ that ships with the 3D45. Although this is actually not a proper ABS but a heat-treated PLA that is tougher than standard PLA. I definitely wouldn’t recommend buying the 3D45 based solely on that, as you can purchase similar PLA+ type filaments for other printers too.
The main reason you should think about picking the 3D45 is that it’s not a tinkerers printer but instead works out of the box with little ability to be upgraded. It offers high-quality prints and excellent reliability
Since the printer is shipped fully assembled, it is easy to use which a critical factor for the intended audience.
Specs
- Filament material: 1.75mm (PLA, Nylon, Eco-ABS, PLA, PETG)
- Build volume: 254 x 152 x 170mm
- Nozzle: 0.4mm
- Maximum heated bed temperature: 212°F / 100°C
Pros
- Easy to use and set up
- Impressive print quality and reliability
- Many safety features make it suitable for families
Cons
- Using third-party filaments voids warranty
- Limited scope for upgrades
Features
The 3D45 can handle printing materials that need high temperatures to print like Nylon, polycarbonate, and Eco-ABS.
It features a heated bed which is removable and a build volume of 10” x 6.75” x 6″ (254 x 152 x 170mm.) Due to the semi-automatic bed leveling, the leveling process is straightforward with picture guidance shown on the 4.5” color touchscreen that guides the user exactly how to tune the leveling knobs.
Another useful feature of the 3D45 is the automatic realignment of the settings when the proprietary filament is used. This is ideal for the user who does not have prior experience with 3D printers. Immediately the printing material is loaded, the printer instantly detects and prepare the settings for the upcoming print.
The integrated 720p camera enables you to view and control the printer even from a remote location via the cloud-based slicer dubbed as Dremel Print Cloud. Apart from monitoring the printing process, you can also create time-lapse videos.
This printer features a Bosch sensor technology and UL certification which improves safety. On top of that, there is a carbon filter to protect the user from harmful VOCs and hostile odors. You can connect the printer via Wi-Fi or Ethernet. There is also a USB socket for printing even when offline.
Verdict
One of the most significant benefits of the DigiLab 3D45 is compatibility with a wide range of printing materials even those that require high temperatures. It is shipped with a spool each of Dremel-branded Nylon and Eco-ABS. If you use the Dremel branded filament, you will definitely achieve high-quality prints.
Other than the issues with third-party filaments the 3D45 is a competent and reliable 3D printer that takes a lot of the hassle and guesswork out of 3D printing.
Conclusion
Okay then, decision time! Which 3D printer is going to be most suitable for you? And the truth is that it depends. It depends on many factors such as how much you can afford to spend on evolving your 3D printing skills, how much build volume you are going to need, how many prints you want over a specific time, whether you feel you definitely would benefit from dual extrusion.
Whatever type of Cosplay props/armor/costumes you want to print, the budget Creality CR-10S is a reliable option and is many peoples gateway into the world of 3D printing.
If you want something more powerful, LulzBot TAZ 6 is the next step, but as mentioned earlier, some of you may not like the absence of the wireless connectivity.
If you’re already an enthusiastic 3D printer owner looking to step up or you have the confidence to know you want to start with something of guaranteed quality, then you should definitely go for the Ultimaker 3 Extended or Raise3D Pro2 Plus.
I really hope this was helpful. Let me know what your experience is with these 3D printers and what you use to 3D print cosplay costumes. I would love to hear your thoughts and happy printing!
-Dylan
Last update on 2024-04-24 at 23:57