

This page may contain affiliate links. As an Amazon Associate I earn from qualifying purchases.
Start A Fun New Hobby Or Profitable Business By 3D Printing Your Own Jewelry Designs
Updated: October 2019


3D Printing is revolutionizing the world of jewelry making. You can now design and make your own professional quality jewelry in your own home.
Making your own jewelry is a great way to make unique gifts or you can even make some money from selling your own pieces.
Read on to find out what you can achieve in your own home jewelry design studio using a 3D printer.
Not all 3D printers are suitable for printing something as delicate as jewelry, so I’ll also help you choose a 3D printer that can bring your jewelry designs to life.
It’s a DLP printer that uses LEDs to cure a liquid resin. The level of detail you get on the FabPro is unbeatable in its price range and this makes it perfect for 3D printing jewelry.
You can read more about the FabPro 1000 and why it’s so good, as well as lots more info on 3D printing jewelry in the rest of my article.
How Do You 3D Print Jewelry?
There are two distinct methods of 3D Printing – FFF, and SLA. For metal jewelry pieces you will need an SLA printer that works with a Castable Resin. This type of printer and resin combo is used to make the molds or patterns that your precious metal is then cast into.
You can also use your 3D printer to print prototypes. This way your client can see and try on designs before you commit to melting metal.
FDM Filament vs. SLA Resin
When choosing a 3D printer for jewelry making, you have two routes to go down, FDM or SLA/DLP Resin. Both types of 3D printer allow you to print molds that can be used to create your final metal alloy pieces.
For many designs, an FDM printer will be as much as you need. If you pick the right printer, it will be accurate and precise enough for most jewelry designs.
FDM printing also opens up a new avenue of using blended filaments. These allow you to print jewelry pieces in a mixture of plastic and metal, that look and feel like metal. FDM printing allows you to print finished jewelry pieces right on your desktop.
If you are more into traditional jewelry making, with pieces that feature fine gem settings, then an SLA/DLP Resin printer is probably a better choice for you.
Currently, the best SLA printers on the market for home or small business jewelry making are the Anycubic Photon S and the 3D Systems FabPro 1000. I’ll review both of these models later in this article to help you choose the one that suits you best.
3D Printing vs Traditional Methods
3D Printing jewelry on an SLA printer is quite clever as it combines the very traditional method of investment casting with the modern technology of home 3D printing.
You print using a material known as Castable Resin. This resin is designed to not leave any trace of ash or debris when it is melted away during the casting process. This means your final product comes out of the mold with a perfect unblemished finish.
In traditional jewelry making a wax model is the first step to manufacturing the piece. This has to be either carved by hand or by a computer-controlled machine. The shape of the final piece of jewelry is limited by what it’s possible for traditional machines to produce. As it’s a manual process, the more complicated the design of your jewelry, the more expensive the wax costs.
It is this part of the manufacturing process that is replaced by the 3D Printer. And because of the way 3D printers work, it is possible for much more complicated shapes to be produced at no extra cost, time or difficulty!
Once the 3D Printer has done its work, you can turn the resin mold into a plaster one and then cast your chosen metal. You can do this yourself, or you can simply take or mail your 3D print to a casting company who can do this for you. The fees for doing this are minimal, usually around $5 or so plus the cost of the metal you choose.
Why 3D Print Jewelry?
3D Printing offers many advantages over traditional jewelry manufacturing methods:
Unique Designs
The most significant advantage it offers is the ability to create one-off bespoke pieces cost effectively.
Although skill and creativity are still needed, 3D Printing makes it much easier to manufacture even very intricate designs.
This frees you up to concentrate on the design and artistry of jewelry making, rather than the practical concerns of how to make your creations a reality.
Printing Jewelry Prototypes
Another advantage of 3D Printing jewelry is that you can make many cheap plastic prototype test pieces before committing to your final design.
This is especially beneficial if you are making a bespoke piece for a client as you can be sure they are happy with the design, size and fit before you commit to the final metal piece.
Speed
3D Printing’s superpower is speed! This gives it a massive advantage over traditional jewelry making. No matter how complex, you can have a resin part finished in a little over an hour. That’s just unbeatable by traditional means.
With a finished part in your hands so quickly, you can easily show it to customers, make changes or make a sale without having to say ‘please come back in a week’ for a trial fitting.
3D Printing Jewelry is Cost Effective
Once you have a suitable 3D Printer, the running costs and price of consumables are very cheap compared to traditional jewelry making with wax molds.
Although the cost of resin is high, you only pay for what you use, and jewelry pieces use very little. A 1-liter tank of castable resin costs around $250, but that’s a lot of resin!
For example, a very large sized cushion engagement ring would use approximately 0.3ml (0.01 fl oz) of resin for the ring itself, plus 5-10ml for build supports. That’s only about $1.50 worth of resin!
Whether your jewelry piece is simple or complex in design doesn’t matter, the only factor that affects the cost to 3D Print is the volume of resin used.
In contrast, traditional custom waxes start at around $100 and increase in cost with complexity. This makes 3D Printing jewelry very cost effective in comparison.
Can I make a business from 3D Printing Jewelry?
Yes! 3D Printed jewelry is currently very popular because you can offer your customers a completely unique, bespoke product.
Customers will happily pay a premium for an item of jewelry that is wholly unique, or personal to them.
You can even actively involve a customer in the design process, allowing them to contribute to the design will give them a sense of personal ownership that isn’t possible buying from a jewelry counter in a shopping mall.
3D Printers capable of creating casting molds are now available for a little upwards of $1000. After this initial outlay, the cost to print individual pieces is very small compared to the price you can retail them at.
Another advantage of 3D Printing jewelry rather than traditional methods is that the cost to print one piece is the same as the cost to print a hundred.
This means as a business; you don’t have to keep a large stock or indeed any stock of your products.
You can simply manufacture as and when an order is placed, preventing you needing to carry lots of stock that may not sell.
What Type of Jewelry Can I 3D Print?
Here are some great examples of jewelry designs that have been made possible by 3D Printing:


Which 3D Printer is Best for Jewelry Making?
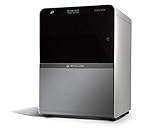
Review: 3D Systems FabPro 1000
3D Systems was started way back in 1986 when its founder Chuck Hull invented stereolithography, so it’s fair to say they know what they’re doing when it comes to 3D printing!
In fact 3D Systems machines are renknowned throughout industry as the go to company for resin 3D printing.
Thankfully, all those years of experience have allowed 3D Systems to pack all their knowledge into a compact machine that has been designed specifically for home and small business users to create small intricate 3D prints like jewlery making and dentistry.
In my lab, I’ve used industrial SLA printers that cost hundreds of thousands of dollars and this incredible little machine performs to the same high standards. The only discernable difference is the size of parts it can make. With a build volume of 125 x 70 x 120mm you can easily print one or several pieces of jewelry at a time.
Why is it so Good?
Where other resin printers fall down is the amount of laborious setup and tasks needed before you get to actually print. 3D Systems has solved all these issues to make resin printing as easy as can be.
The FabPro is also designed for speed. Where other systems are slow with clunky resin filling procedures and laborious post-processing, the FabPro has been optimized for every stage of manufacture.
The machine and its materials have been optimized to offer an average 45% faster print speed with up to 21mm/hour possible when using the Tough grey material.
Costs are also comparably lower using the FabPro 1000. Due to the intelligent software optimizing support structures, and the low cost of materials, 3D Systems estimate an average 22% lower cost per part compared to competitors machines. For a small business that can mean a siginificant change to your profit margins.
Materials
One of the main benefits of the FabPro is the material choices 3D Systems have developed specifically for this printer. They include a green casting resin called FabPro Jewelcast Green. This is perfect for gypsum investement casting as it creates a fantastic high quality casting finish with minimal ash debris. This material allows you to easily create the finest details and super smooth finished on your jewelry pieces with a minimum resolution of 0.03mm (0.001 inch).
The more standard resin materials are FabPro Tough Black and Grey. The black material can be used for either prototype or final pieces whereas the grey material is faster to print (21 mm/hour) and more suitable for prototypes.
Finally, unusually for resin systems, there is a rubber-like material available called FabPro Elastic Black. This can be used to create flexible rubber parts with a shore hardness of 65A.
Is the Software Easy to Use?
Yes! 3D Systems include their own 3D Sprint software, and it’s a very competent package.
There are a few preferences to input such as what resolution you want to build at (from 0.03mm to 0.1mm). But from then on 3D Sprint does a remarkably good job on its own.
Firstly it will rotate your model until it finds the optimum orientation. Then it will add its own suggested support structures. These are thin legs that hold up your object while it’s being printed. They help to keep its shape and prevent it collapsing.
The supports are nicely designed to be very thin where they join to your part. This allows you to trim them off of your part very easily and reduce the number of blemishes that are left. In fact for many geometries you can snap your print away from the supports with minimal clean-up required.
Finally, 3D Sprint will let you know how long it’s going to take to build your part with the current settings.
If at any stage you don’t like the suggested build orientation or location of build supports, it’s just a few clicks to adjust either to your preference.
If you’re printing multiple parts, 3D Sprint has an Auto Placement function that optimizes the printers volume for maximum efficiency. You can store custom placements for future use.
How Easy is it to Print?
The printing process itself is as simple as you could wish for. Once you’ve loaded the resin cartridge, you just slide the resin tray into position and clip the wiper blade down. At each step, the on-screen display tells you if you’ve done everything correctly, or warns you if you haven’t.
An on-screen spirit level warns you if your printer is unlevel and helps you adjust the appropriate foot to make it spot on.
Next up you need to send your print file to the printer. You can do this via network cable. The on-screen display is very adept at showing a queue of jobs, which is ideal if you plan to use the printer in a business or office environment with multiple jobs or people.
Each part that you upload to the printer is shown as an image on the screen, so you don’t have to remember file names only.
Once you press print, the FabPro starts to fill the tank with just enough resin to print your part. Then it gently heats up the resin in the tank to a comfortable 30°C, occasionally giving a quick stir with the wiper arm, then printing begins…
You can set up the included software to email or text you once your print is complete. Again a handy solution in a business environment.
In use, the FabPro 1000 is very quiet. As the build plate raises for each layer and the wiper arms slide across that you get a slight whir of motors but this is a machine that you could comfortable sit next to and work without distraction (other than being mesmerized by it working!).
Post Processing
3D Systems has put a lot of effort into making the post-processing part of resin printing as easy as possible. Unfortunately, the downside of resin printing is that the parts don’t come off the build ready to use. They will be covered in sticky uncured resin and will need a certain amount of cleaning and processing.
Thankfully, 3D Systems has made this often frustrating process a breeze by designing accessories that solve every common problem. From stands to grips, removers to liquid baths, the whole process is optimized and made easy with the right tools.
Firstly, removing your finished part from the build platform is made much easier and safer with a neat holding clip that grips the platform, so you don’t jab the removal tool into your hand.
Next, you can take advantage of the cleverly designed cleaning station. There are two rinsing containers held in a stand and a useful tool for lifting parts to and from them.
You drop your part into the first of the tubs with the gripping tool, give it a swirl around and then leave to soak for about 20 minutes. Then a quick dunk in the second tub and the part should come out clean and ready for finishing.
3D Systems include some useful snips to break off the build supports.
Although all this can sound like a hassle, the way you feel when you see your finished ring or bracelet will make it seem more than worthwhile.
Compared to the highly manual process of traditional jewelry making with a wax mold this is a dream.
FabPro 1000 Verdict
I can’t hide my enthusiasm for this little 3D printer. It is genuinely groundbreaking. The quality of finish is astounding; the price is a bargain and the ease with which you can create resin parts incredible.
For jewelry making the FabPro 1000 is a perfect companion. It can easily meet the high quality needed to print such delicate detail and best of all it will do so with ease, again and again in a production environment.
The most important attribute of the FabPro 1000 is that it is so hassle-free it will leave you to get on with what you want to be doing – designing jewelry!
Lastly, 3D Systems have an excellent record in customer service. If you should hit any problems, they are always on hand to help. Afterall they have been doing this longer than any other company, so they have most of the answers!
Review: Anycubic Photon S
A wonderful thing has happened in the world of 3D printing. The incredible technology of liquid resin 3D printing has suddenly become very affordable.
The Anycubic Photon isn’t the first low-cost consumer SLA style 3D printer, but it is the first that has proven itself to be not only cheap but also very reliable.
In fact, it’s quickly become one of the most appealing 3D printers on the market today. Many people who already own an FDM 3D printer are investing in a Photon as a second 3D printer because it allows you to print a level of detail that just can’t be achieved on FDM printers.
Anycubic has been at the forefront of producing reliable and affordable FDM printers that are packed with top of the range features. In term of price, the Anycubic Photon is considered to be the cheapest DLP 3D printer that actually works reliably.
Since it was released, the Photon has been gaining a lot of popularity across the 3D printing community. At only around $500, this machine is going to revolutionize the SLA/DLP 3D printing sector.
Verdict
If you are looking to 3D print highly detailed jewelry, then there’s no better method than liquid resin printing.
The Anycubic Photon has truly revolutionized the world of DLP 3D printers by merely creating a genuinely reliable and easy to use DLP 3D printer for a budget price.
It is robustly built and packed with impressive features that can only be matched with high-end printers costing many times more. Since it is fully assembled, the setup process is very intuitive, and there is a growing community of owners who have created lots of great YouTube videos and guides to getting the most from the Photon.
What is DLP?
The first thing you should know is that this printer is a desktop 3D printer that uses DLP technology. This is different from the FDM technology that is found in most 3D printers. Instead of melting a filament from a heated nozzle and printing bed, DLP printers use a liquid resin which is cured by UV light to form three-dimensional objects.
On the other hand, most SLA printers such as the Formlabs Form 2, uses a laser to cure the resin. However, DLP printers utilize a technology known as ‘Digital Light Processing.’ In this process, the whole image of the layer is exposed to light, effectively curing the resin layer by layer.
One thing that sets the Photon apart from its competitors is the ability to produce highly detailed objects. The resolution of the screen that emits light is an essential factor to consider when looking for a DLP 3D printer. This printer comes with a 2K resolution which, while not the highest, is excellent at this price point and will produce extremely detailed prints.
Build Volume
The Photon has a build volume of 115 x 65 x 155 mm which is quite small compared to FDM printers but average for DLP. If you want to print bigger objects, you will better off with open-frame FDM printers. Nonetheless, if you are a 3D printer enthusiast, you will be intrigued by what the Photon has to offer.
Safety with UV Resin
Before delving into resin printing, you should be aware that it can be a messy process and it uses toxic chemicals. It is vital that you take precautions when handling the liquid resin and uncured prints.
After printing, you will be required to wash the pieces with ethanol, cure them with a UV lamp, and clean the build plate. It is a messy process that can’t be avoided. The Anycubic Photon does have a carbon filter. However, the odor of the resin can still be very strong, especially in poorly ventilated spaces.
As a precautionary measure, users are strongly advised to wear gloves and protective masks when pouring the resin. Also, you should use the Photon (or any other resin-based printer) in a sufficiently ventilated room.
The way to get the best from resin printing is to be neat and orderly. Ideally, you should set up a cleaning station on your workbench with the surface protected from spills. Once you’ve had some practice and worked out a method, cleaning and curing your prints won’t seem so daunting and you will get some great prints.
Post-Processing
Unlike FDM printers, DLP printers require regular cleaning both before and after printing. For instance, with the Anycubic Photon, you will need to remove the resin tank and remove any cured bits of resin that are swimming around. If you don’t clear these out, they could interfere with your next print and cause it to fail. To do this, place the filters provided in the package above the mouth of the resin bottle and pour the material. The solid parts will be strained out by the filter.
You should be careful when cleaning the resin tank particularly with the FEP film at the base. If you are not careful, you might scratch the film, and you will need to purchase another one. That is why you should use the plastic spatula provided when scraping out the cured resin chunks.
The LCD projector is another crucial component of the Photon that require cleaning. It is critical that no dust, resin or anything obstruct the light projector and the resin tank. The best way to clean these components is by using isopropyl alcohol.
Software
Anycubic provides their own slicing software with the Photon, and it works very well. You will only be required to change a few settings such as layer thickness, exposure time. However, until you’ve learned the ropes, you can happily leave these settings as default.
Thankfully the Anycubic Slicer provides full support structure control. You have the option to auto-generate supports or insert them manually. The slicer provided in the Anycubic Photon will enable you to control the shape, placement, radius, length, and density of the support structures. So you can place them in a way that leaves the least witness marks on your print.
Overall the Anycubic slicing software is fast and easy to use.
Review: Ultimaker 2+
Unlike the two 3D printers below, the Ultimaker 2+ is an FDM printer. This means it heats a solid plastic filament to make your prints, rather than solidifying a liquid resin.
In general FDM 3D printers are less accurate than SLA printers, but the Ultimaker 2+ can print to such high accuracy and precision that its prints can rival those of an SLA printer.
The Ultimaker 2+ is also able to print using Moldlay Filament and other wax filaments. These are designed specifically for investment casting using the ‘lost wax’ method and are suitable for making molds for most jewelry metals.
Why Choose an FDM Printer for 3D Printing Jewelry?
Although SLA Resin 3D printers will give you a better quality finish on fine detail such as gem settings, the best FDM printers like the Ultimaker 2+ are quite capable of printing details as fine as 20 microns.
If you are making jewelry that has fewer fine features, then the Ultimaker 2+ is a great choice.
The Ultimaker 2+ is also perfect for printing prototypes. You can print jewelry items within a few hours to allow your customers to see and even try on pieces before you commit to making the final piece.
Blended Filaments
If you buy an Ultimaker 2+, you can also make use of an array of exotic filaments. These are plastic filaments that are blended with metals and other materials such as wood.
When you make jewelry using these materials you can achieve fantastic finishes that have the same characteristic luster, sheen and feel as metals such as copper, silver, and brass.
Exotic filaments are great for making contemporary looking jewelry from materials like bamboo or carbon fiber.
Ease of Use
One of the main benefits of the Ultimaker 2+ over SLA printers is the ease of use and much shallower learning curve. The design of the Ultimaker has evolved over a few years; bugs have been ironed out, so it’s very straightforward for you to turn your jewelry CAD model into a finished piece.
Verdict
3D printing is revolutionizing the world of jewelry design. When choosing a 3D printer, many people are looking for a product that effectively replicates traditional manufacturing methods like casting.
You can use the Ultimaker 2+ in this way but you can also use it in much more creative ways. If you embrace the use of exotic blended filaments, you can design and manufacture exciting new jewelry designs right on your desktop. 3D printers like the Ultimaker 2+ allow you to create designs that just a few years ago would have been impossible to make.
The Best 3D Printer for Jewelry Making
Any of the 3D printers I’ve reviewed will give you a great start in the world of jewelry design and manufacture.
Before you choose which printer, you need to carefully consider what kind of jewelry you want to make. If you want to cast intricate metal jewelry then a DLP resin 3D printer is your only option. Whereas if you want to make contemporary colorful designs with less detail, an FDM printer like the Ultimaker will fit your needs.
If you want to embrace the new possibilities that 3D printing can offer you, then the Ultimaker 2+ is an excellent choice that will open up many creative avenues for you.
If fine detail is most important to you, then you should look at the 3D Systems FabPro 1000. If you are looking to start a business making your jewelry, where reliability and repeatability will be important then the 3D Systems machine is much better suited.
Both printers are a joy to use, designed by people who have used them, listened to user feedback, and improved them.
For printing jewelry, you need a printer that can handle the finest detail down to 0.1mm and beyond. You need confidence in the tool so you can concentrate on harnessing your creativity and honing your design skills. In every aspect, the 3D printers above deliver for jewelry making.
I hope you found this article useful and it helps you in your new business venture or hobby as a jewelry designer!
-Dylan Miller
Last update on 2024-03-25 at 16:20
I’m wondering where the Nova3D UV light Resin printer may fit in to these comparisons. It is advertised as having MUCH higher maximum resolution that what you state as the minimum practical detail level of 0.1mm for jewelry. It supposedly can achieve 0.0125mm on Z axis and 0.05mm for XY . In addition the price is about 1/6th of your favorite. Assuming I work in a ‘clean room’ with very little dust and sufficient protection from human contaminants I’d like to think it might be good choice for those who, like me, are entry level/hobbyist. You appear to have significant experience with these devices and am curious how you think it might perform compared to these ‘out of my budget’ devices you have reviewed.
Hi Jason,
Thanks for your comment!
I’m not familiar with the Nova3D, but I see Amazon have just started stocking it so I’ll see if I can get one in to review. At first glance it looks a lot like a rebadged Formlabs Form 1, which would make it quite good value for money.
Thanks for the heads-up!
-Dylan
Hello Dylan.
Thank you for a great article. It helps a lot.
I am looking into buying a 3D printer for my jewelry passion, and I am now at the point of hesitating between form2 and B9Creator v1.2…. very nervous as it is a very big investment for me.
Any thoughts about B9Creator v1.2? would you recommend it over form2?
thanks a million.
AM
Wonderful review of Nobel 1.0A. You have provided such a good content through this post. Keep doing good work and keep sharing.
I am highly intrigued with 3D Printers but have no experience whatsoever with them. I would love to buy one and play with it to make jewelry, but how do I learn to use one?