

This page may contain affiliate links. As an Amazon Associate I earn from qualifying purchases.
Updated: March 2021


Print High-Quality Miniatures On Your 3D Printer
3D Printing Miniature figurines can be a challenge. They’re the ultimate test of detail and precision for your 3D printer.
In this article, I’ll tell you which settings and practices you should use to successfully print miniatures on your FDM printer.
If you’re looking for help deciding which is the best 3D Printer for making your own miniatures then check out my article ‘The Best 3D Printer for Printing Gaming Miniatures‘.
Resin Vs FDM
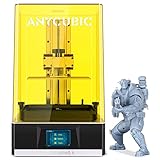
If you’re lucky enough to have a resin printer such as the Longer Orange 30 or the Anycubic Photon Mono you’ll already know that straight out of the box they can print the intricate detail needed for miniatures.
 x 3.14\"(W) x 6.49\"(H) Printing Size")
FDM printers can’t quite get the same precision as SLA printers but they can get surprisingly close, they just need you to give them a helping hand to get the best from them.
Resin has some disadvantages too. Dealing with the liquid resin can be messy and it makes post-processing prints a bit of a chore. Once cured, resin is generally a little more brittle than PLA and has lower impact strength, so you may need to be careful when designing minis with thin cross-sections.
Success Is In The Detail
The secret to successful miniature printing is detail. Figures in particular are one of the hardest objects to replicate properly on a 3D printer. Think of all the detail around facial features and clothing, weaponry and adornments. And then remember this has to be seen on a model that’s 28mm tall!
But like a great artist painting a picture you will realize that not every tiny detail needs to be replicated to be seen. A lot of the art of 3D printing miniatures is in learning what detail you can leave out.
If you are going to paint your miniatures then you have another opportunity to leave out detail in the printing stage and add it in later with paint.
But before you work out what to leave out let’s look at how to get the most detail into your 3D printed models.
3D Printer Settings
Take It Slow
The only reason to print fast is your own impatience! Printing slowly will always give you a better print quality. In many cases you won’t need to worry about it but when printing miniatures you need to print as slow as you can.
At most you should be aiming for 30mm/sec, smaller areas can be dropped to 20mm/sec. This is probably half the speed you’re used to. It will seem slow if you watch every layer building, so don’t! ‘A watched kettle never boils’ as my Gran always said.
Layer Height
When it comes to layer height, smaller is better. But it’s also important to work out what ‘step’ in Z your 3D printer is capable of and so find out what layer height your printer can actually achieve. This is particularly important on budget 3D printers that most likely don’t achieve what’s written in the spec sheet.
Many 3D printers have a ‘Magic’ layer height. This is related to the stepper motor resolution and the pitch of the z-axis lead screw thread.
In summary, your layer height should be a multiple of your Z-axis lift per full step. This is usually a random looking number such as 0.04375, not the 0.05mm that you may be used to using.
If you don’t use the ‘Magic’ layer height then the motor will try to stop in between steps. As this is not possible it will either make the layer too thin or too thick.
If you don’t know your lead screw thread pitch off the top of your head (what kind of a 3D printing enthusiast are you!?) Then you can look it up in your 3D printer spec sheet that is hopefully in the back of your manual or fortunately, this information is often only a Google away.
Here’s how to calculate your Magic Layer Height using my Monoprice Select Mini V2 as an example:
Known information from Manufacturer Specification
Stepper Motor Step Angle: 7.5°
Steps per full rotation: 360°/7.5° = 48 steps
Z-Axis Lead Screw Spec: M4 x 0.7mm
Calculation
Height Change per Motor Step: 0.7mm / 48 steps = 0.0145833333333mm
To make this a nice number let’s multiply it by 3: 0.0145833333333mm x 3 = 0.04375mm
So our ‘Magic Layer Height’ is 0.04375mm
Every time you set your layer height, instead of setting it to a round number such as 0.2mm you should set it to a value that is a multiple of your Magic Layer Height. In this case, instead of 0.2mm you would set it to 0.21875mm (0.04375 x 5).
Although this is a larger height and therefore you would expect it to be a slightly poorer resolution. In fact, it will give you better resolution because the motor and lead screw are able to accurately and repeatedly obtain that step value. Whereas at 0.2mm step you would see a greater deviation from it.
Initial Layer
The first layers that your printer lays down are called the initial or bottom layer and they contain 100% infill. They help with bed adhesion and compensate for any unevenness or a poorly leveled bed.
As the setting for the initial layer is often a number of layers rather than a total thickness value, is important to increase this when you are using very thin layer heights to print your miniatures.
Ideally, you should aim for at least a total of 0.5mm thick before the infill is reduced. If you’re using a layer height of 0.04mm this would be at least 12 layers. Your default settings are more than likely set to something like 5 initial layers, giving you a ‘base’ of only 0.2mm thickness.
Cooling
Adequate cooling is essential when you’re printing highly detailed objects. A lot of the geometry on a miniature will involve printing on unsupported areas.
This means you need the filament to cool the instant it has left the nozzle. Ideally, you should retrofit something that will give you 360° nozzle cooling such as this Diii cooler and Radial Fan for the Monoprice MP 10 Mini.
Minimal Layer Time
You may be tempted to increase your minimal layer time. This will allow time for each layer to cool before the next layer is printed. Unfortunately, this can have the problem of your nozzle dripping excess filament whilst it waits before commencing the next layer.
This blob of filament on the end of the nozzle then finds its way onto your print and makes a mess.
One way to get around this is to print more than one object at a time. This way when the last layer is cooling on your first model, the nozzle is busy printing the same layer on your second model. This gives each layer adequate time to cool without leaving your hot nozzle waiting around with time for the excess material to blob out and ruin things.
Supports
For most 3D printed objects the default support structures provided by slicing software such as Cura will be adequate. But for complicated miniatures, I suggest downloading a free copy of Autodesk’s MeshMixer.
Default supports tend to be applied indiscriminately to the whole object. This can result in many supports where you don’t need them and they can be hard to remove from small areas such as facial features and limbs without damaging your miniature.
Meshmixer gives you the ability to use organic tree branch like supports that can be positioned exactly where you need support and no more. The supports can be shape exactly as you require so they have the required strength but remain easy to snap off leaving little surface damage.
Say No To Oozing
You should pay special attention to your retraction settings. Experiment with some test pieces until they are spot on.
Retraction controls how the filament continues to ooze from the nozzle when it has finished extruding. When a layer has finished printing, retraction prevents more filament being extruded before it is required to start printing the next layer.
This is more of a problem in printers that use Bowden filament feed. Bowden feeds are when the extruder is separated from the hot end by a tube that the filament runs inside. The alternative system is called direct drive and has the extruder directly next to the hot end.
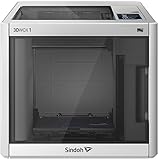
Direct-drive 3D printers like the Qidi X-Pro pictured below, have much more precise control of the filament feed.

In a Bowden setup, the retraction settings have to overcome the play that is in the Bowden tube. So finding the optimum setting may take a little experimentation.
Summary
As you can see there’s nothing here that’s massively complicated. Take a few hours to work through this list and you’ll be rewarded with perfect 3D printed miniatures.
And best of all optimizing your 3D printer with all these settings will not only give you the best quality miniatures. It will improve the quality and reliability of all your 3D prints.
Happy Printing!
-Dylan
Last update on 2024-04-05 at 04:43
3D printing has become more used than before. It wasn’t a very cost-effective source of printing previously but I think now that more people have a 3D printer, it has become easier to print that way. There are a lot of businesses that use 3D printers to show something that will be larger on a smaller scale.
My son really loves little miniature sculptures and loves to make them! I thought it would be fun to have some printed out for him. That is true that not every tiny detail needs to be replicated! I think it would be much easier to print his sculptures out if he left out some details and added them in with paint later! Thanks for the great tips!
The “great guide to using MeshMixer supports” link is malicious. It installs malware.
Thanks for the heads-up, Mike. I’ve removed the offending link.
-Dylan
What about changing your nozzle size? If yuou normally print with a 0.4mm shouldn;t you use something smaller? maybe like a 0.2mm?
“To make this a nice number let’s multiply it by 3:”
Could you explain this step a little more? Why are we multiplying it by 3?
Also, how do you know that you’re Z=0 is on a full step? If it isn’t, wouldn’t you be micro-stepping for the entire print?
Thanks in advance.